Friday, September 28, 2012

My New EV Plates

Today I finally was able to get my new plates for my EV!


It was quite a production getting these new EV plates. The RMV said I the first one to get these new EV plates, they had no idea what to do or where they even were. These plates came out this past March and they had just opened the box they came in for me, so I got to choose the plate number!

It took a few phone calls to figure out what do to, but in the end I have my new plates and I got it inspected so I am ready for commuting!

Tomorrow I am going to put the splash guard back on and get the heater running, its been in the low 60s during the day and low 40s at night so heat would be nice in the mornings.

Sunday, September 23, 2012

Charger Plug

I installed the charging plug on my EV today!

I also went on a few drives today to collect more data and figure out what to do next. I have figured out how I am going to wiring in my heater, but next is getting the new EV plates. Once I get the new plates I am going to get an alignment and my rear suspension adjusted. I will also need a new inspection, so for fun I am going to bring it down to the Honda dealer and see what they do!

I am expecting to start full time commuting in the EV next week, or even this week if I get the new plates and heater running tomorrow.

I still have small things to do on the EV, like a proper AH counter, but for now I am extremely pleased and can't wait for full time commuting!

Saturday, September 22, 2012

It Drives!

It drives!

Today I fully charged the pack without any problems that I could find. It did end with a lower voltage ending than I was expecting, but later I found that was a volt meter problem.

Here is a video of the first real drive:

I have charged with both 120v and 240v, with 240v being much better. I have put on 18 miles with the first charge, drove up and down massive hills, hit 45 MPH all with ease. I have the Zilla Z1K-LV set to 520 motor amps and 360 battery AMPS, or 2C, so way under specs. The EV drives better than it did with the 127 HP Honda engine in it!

Now I have to hook up the tachometer to the Hairball and get the heater running. I did use Rain-X to clean the windshield and their new anti-fog cleaner on the inside to see if it helps at all. I don't mind not having much heat as I do have heated seat cover but I do not like fogging.

So far I am extremely impressed, it far outperforms what I have been hoping for and I'm not even close to maxing out my settings.

Wednesday, September 19, 2012

Lithium Fun

Today I got the CALB lithium cells installed!


I spent this morning install the circuit breaker and getting the CALB sells situated and strapped down. I have 550 lbs of batteries and 5 straps, 4 with 1200 lbs working strength and one with 2400 lbs working strength, much better than what i have with the lead sled.

I will be making a steel enclosure with a nice clear plastic top, but first I have to install the MiniBMS and drive it a bit! I could have finished today, but I did not have enough wire to install the MiniBMS. All I have left for a test drive is the BMS, so tomorrow evening I will start that and Friday will be a test drive!

Monday, September 17, 2012

Battery Tray Installation

Today I had a busy day with meetings, but when I got home I started installing the tray. I ended up messing up the single battery tray add on, I compressed the pieces together with a clamp and it removed the JB Kwik so it snapped while I was bolting the tray down!

So my dad helped me with the tray by brazing the pieces together.


 I also finished building the power cables. You can see the Elcon 2000+ in the left part of the trunk.


 And here is the tray FINALLY mounted in! I just need one small piece of plywood to fill in the space for the last cell.

The next thing I have to do is mount the Airpax circuit breaker and mount the batteries! I also have to remove the fuel filler and install the charging plug socket. My plan is to mount the circuit breaker, wiring in the batteries and give it a first charge before I install the charging plug. I am aiming for a test drive on Friday afternoon, I need two more hours to install the batteries then I need to charge them up!

Sunday, September 16, 2012

So Close!

Today was almost a full day working on the EV. I routed the 2/0 power cables underneath the EV, which took a long time! I used the old exhaust tunnel under the car to route the cables, then I zip-tied them up to the car chassis. I spent about 3 hours just routing cables because I had to jack up different sides of the EV to get around underneath.

I also mounted the Elcon 2000+ charger and added the small bracket on the battery rack for that lonely battery and painted it. Time flew by so fast today that I forgot to take any pictures!

So what is left before I can test drive? I have to crimp two more lugs, bolt down the battery tray, install the batteries and MiniBMS, then charge it up! I think I need another 3-4 hours of time so I am now aiming for a Friday test drive.


Saturday, September 15, 2012

On The Ground

Today was a full day of EV building! I woke up this morning to rain, but by the time I had finished waking up and eating breakfast the sun had come out and everything was pretty much dry.

I had lots of help today, I have a goal of a test drive Sunday afternoon, so I needed to get a lot done today.
My dad spent most of the day working on installing the speed sensor on the motor:


I spent the day finishing the 12 volt system, installed the 12v aux battery and tested the system. I also hooked up the motor to the Zilla and cleaned up a lot of the wiring with zip ties. Then we dropped the car off the stands onto the ground and rolled it forward so the trunk is now under my tarp.

Erin cleaned out the trunk and we started to figure out the battery installation. Tomorrow I am installing the battery tray, adding a small attachment to hold the lonely cell #45 and make the high power cables.

I am really hoping for a test drive tomorrow afternoon, but I am not going to rush anything. I want this done right, and I want it to look good. Tonight I am thinking through how I am going to hold down the batteries and tomorrow I am having another full day of EV fun.

Thursday, September 13, 2012

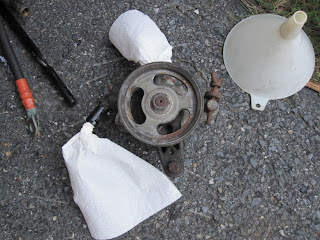
Power Steering Removed

This evening I removed the power steering pump. I figured it might take an hour or so to get the hoses off, pump drained and then make loop connections to connect the input + output hoses from the pump to each other to reconnect the system.

Well it took about 10 minutes!


I was actually surprised, I could connect the two hoses right to each other without needing any adapters or cutting!

Tomorrow I am going to finish everything in the front except the final controls for the heater and A/C. I have to design a circuit that will integrate with the Civic's electronic climate controls, so that's on my list of things to do.

There is a good chance of a test drive Sunday afternoon! I plan on spending all day Saturday getting my battery tray installed, making high power cables and charging the pack up. 

Wednesday, September 12, 2012

Control Tray Mounted

I've been so busy working on things that I keep forgetting to update this!

I have the tray bolted down along with all the major components. I hooked up the vacuum brakes and the throttle cables and have most of the low voltage wiring done.

Here is what is left for the front:
- Find wiring for "key" start for the Zilla
- Find the ECT, Countershaft, and TPS wires
- Install the Speed Sensor on the motor
- Put the 12 volt battery back in
- Wire high voltage to the motor
- Fill the heater system with Antifreeze
- Remove the Power Steering pump

 It sounds like a lot, but it really isn't. Then I work on the batteries! My BMS arrived today but I wasn't home to pick it up so tomorrow morning I am going to visit the post office to get it. I hoping to install the batteries, hook up the BMS and make the heavy gauge wires this weekend and with any luck there may be a test drive soon!

Monday, September 3, 2012

Start of the Control Tray

Today we started to build the control tray. I'm waiting for a new pulley for my A/C setup so that's on hold for now, but I have a lot to do.

So today we cut out a new tray, this time it's out of 1/2" plastic sheet instead of mismatched steel plates!

Here is a picture of the tray installed and the components placed on for location checking:


Before I finish off this tray I have to install the heater and remove the power steering pump. There is a nice gap under the Zilla and behind the motor where I am going to put the heater and water pump. So now I am making the mounts for the heater parts, then I will bolt everything down to the tray. Progress is slow but steady, I want this to really look good and not be partly working.

I do have to remove the power steering pump, I am thinking about looping the connections from the pump together and keeping the steering fluid reservoir in the loop. 

Sunday, September 2, 2012

A/C Testing

Today I played with the A/C setup to see how if it was going to work out.

So the past two days my dad and I have been building the mounts for the stock Civic EX A/C compressor and the motor I am using, a treadmill motor I got years ago for $20. The specs are: 2.5 HP peak @130 volts, 1.5 HP cont @ 95 volts, 18.5 AMPs and 6750 RPM.

After doing some research on this motor I decided that 36 volts would be a good base start, which seems to be about 2500 RPMs at the treadmill motor unloaded (just on A/C pulley, clutch disengaged). I hooked up my current shunt to the (+) line and proceeded to test as there is no data on the actual power requirements on the Honda Civic A/C compressor.

Test 1:
Pulley on the treadmill motor: 3" diameter
Pulley on the A/C compressor: 4.5" diameter (stock)

Voltage: 36 volts
Current: 25 AMPs


The A/C was blowing cold in about 15 seconds and it gave me two very important pieces of data: It takes 1.2 HP to run the A/C and it's too much current for my little treadmill motor!

I decided to bump up the voltage to see if it would lower the current for my next test.

Test 2:
Pulley on the treadmill motor: 3" diameter
Pulley on the A/C compressor: 4.5" diameter (stock)

Voltage: 48 volts
Current: 29 AMPs


Well, the current went up! It went up because the compressor was at a higher RPM and more load was on it so it needed more power.

For my next test I am going to stick with 36 volts, but go to a smaller diameter pulley. I have a 2.625" pulley that I am trying to get onto the motor shaft and I have found a 1.93" pulley online that I ordered up and I will use that in the final setup.

So the A/C is on hold until that pulley comes in, but that's fine. Tomorrow I hook up the heater and start the control tray! 

Saturday, September 1, 2012

A/C Compressor Brackets

For the past two days me and my dad have been building the brackets for the A/C compressor and the PM motor I am going to use to run it. It's a lot of work because the A/C compressor has the stay in the car unless I want to deal with discharging and recharging it for big bucks, so it's been taking a while, but well worth it.


I've had this motor since I built the first EV but just didn't want to spend the time to mount it. After 5 years of driving the EV without A/C I just knew this EV was gonna have it.

Now I've been reading a few things about these PM treadmill motors burning out but after reading about them I think the consensus was don't run think at pack voltage. My research says 30-40 volts should do it the trick to tomorrow I am going to rig up 36 volts and my current shunt and attempt to see if the A/C works!